Country Garden Gift Boxes (for Craftwork Cards)

Here are four gift boxes, with self-designed construction, featuring the new, and fabulous, Country Garden papers from Craftwork Cards. They are embellished with Card Candi from the same range, as well as paper bows from the offcuts. A smidge of Liquid Pearls here and there, and hey presto, a lovely project. And they got even more air time during the Craftwork Cards Birthday Bonus on Create & Craft on 15th/16th April – thank you Julie!

Full instructions and links to the templates are available at the Craftwork Cards Blog, here.


Topiary Trees with Candi

Topiary Trees

I’m a bit behind on my posts this week… This is a pair of topiary trees that I made especially for the Craftwork Cards Candi Week, and they’re a giveaway prize over at their blog (still chance to enter if you’re really quick!). To see more on how I made them, go to this post. The planters are made from sheet greyboard, covered with titan buff acrylic and weathered with dry brushed Vintage Photo Distress Paint and Distress Ink. The balls are 8mm beads skewered onto cocktail sticks. The trunks of the trees are wound paper, and I rumpled tissue paper round it to add a bark effect.


Upcycled Mini-Egg Tube Storage Solution

The master of crafty invention, Tim Holtz (along with his friends at Ranger Ink), has come up with a brand new mini-applicator tool for the ever popular Distress Inks – if you’ve not come across it yet, it’s circular and smaller than his previous rectangular ones. I’m still waiting on my order for the tool, but I had a delivery of the replacement foams…

I came up with a storage dispenser for the foams, but the design was a little flimsy and I wasn’t entirely happy with it. As I was munching through some Cadbury’s mini-eggs (don’t you just love this time of year?) I was pondering the design… and then realised as I was about to chuck the tube away that it might be the solution. A quick check showed it was just the right diameter to take the foams, and a new design was born. Before… and after:

Continue reading

More from my archive…

Train

My Mum turned up yesterday bearing gifts, and a lot of stuff she’s clearing out from the loft. One box contained collected items that are somewhat mice-nibbled, but are an archive of my childhood craft activities and school books. The above painting of ‘a train’ is perhaps one of my first forays into painting, aged 3½.


Collage CardThis is a Mother’s Day card – complete with insert reading ‘to mummy with love from Neil’. Not a bad first collage at the age of 5, March 1976.


SnowmanPerfectly apt for this time of year, this snowman was a wax on sugar paper masterpiece when I was living near Dubai in 1978, aged 7. About as far from snow as I could get at that point!


Guinea PigsWe’ve no idea whose guinea pigs these were as I think we were still living in Dubai at the time – I was 8. Notice the rosettes in the hair – I last had guinea pigs five years ago, and think I’d probably draw them similarly now 😉


Coconut IslandThis treasure island is undated, but probably from around the same time. It’s that time in drawing development when ‘sky’ meets ‘ground’ – although I wonder if it’s sea at the top with the sails of the ship appearing above the hill. May be a first foray into distance and perspective?

Cake Decorating – an edible donation cheque!

Rainbows Donation Cake

This is what I spent four and a half hours on Sunday afternoon doing – and it was handed over to Rainbows Hospice this morning, so I can now share it! The spectacular sum was raised by the staff of MGC Hayles and Woods Coaches over the year, with the Rainbows Walk in Leicester, a choir concert, the national Three Peaks Challenge and (in a after-pic addition to the icing) a business challenge task. I was commissioned to take an iced cake (twin square sponges) and turn it into the donation cheque. I mocked it all up on the computer before printing it out and transferring the design on to the fondant icing by pressing through. Then it was just the small (and patient) matter of piping and cutting. The process wasn’t helped by the icing mixes looking a muddy brown colour when mixed, but when dried, the colour theory did end up working. The finished cake is 9″x18″.


Christmas Quilt

Quilt No. 9 Here’s my happy-accident Christmas Quilt that I’ve just finished, my ninth quilt. I started it early this year using a January sale jelly roll, with a hiatus during studio construction and starting the new business. Unfortunately, the lone star pattern I was following wasn’t followed closely enough, and I completely ballsed up the strip cutting. Hence the single lone star in the middle, and the hash borders – which by happy accident have worked nicely. Given everything outside the centrepiece is completely made up, I’m pleased with the outcome. I still haven’t quite mastered the layering of backing, batting and top sheet, especially on my own which is why things are a bit baggy in places. That may settle a little after a couple of washes. Mind you, after 22 feet of hand sewing the binding on, which took 4.5 hours, I’m pretty good at that! Now to find somewhere large enough to display a 6’6″ square quilt… that hasn’t already been bedecked with decorations…


Family Circle 1901

This is my final project as a member of the WOW! Embossing Powder Design Team. This family project published today, here, features my great great grandfather and his eight children. I’m in a black and white phase at the minute, and wondered if the whole frame looked a little funereal, but then others have said it’s quite gothic and in keeping with the end of the Victorian era. I’ll go with that 😉

Christmas Art Journal Workshop

Some how, in between packing boxes in the studio, completing Day 1 of CC102 and catching up with various admin jobs, I’ve managed to snatch some moments to work on December’s workshop project – a hand made Christmas Art Journal. For more details and to book your place, go to my Workshops Page.


250,000 views – the giveaway

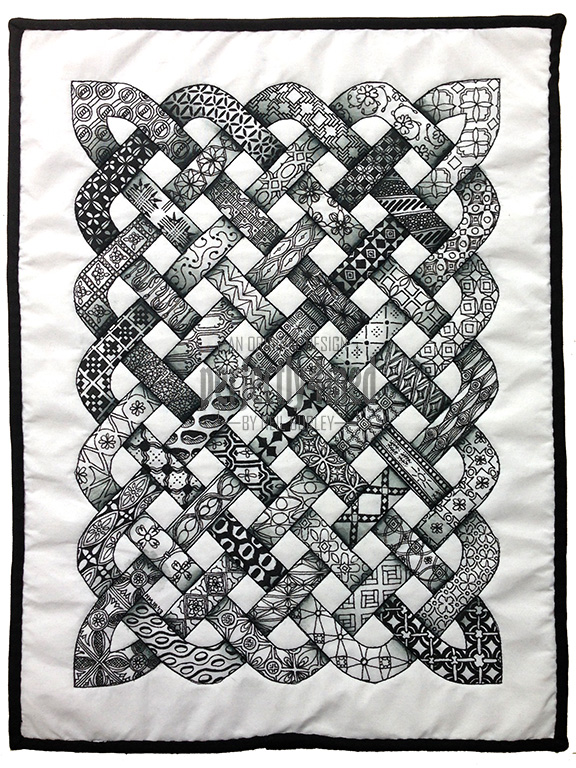
Completed quiltIt’s not long to wait before my little corner of the blogosphere captures it’s 250,000th view. I gave you a sneak preview of my giveaway a couple of weeks ago… and here’s the whole thing! I’m giving away an A3 quilt featuring 100% cotton fabric onto which I have hand drawn and shaded tangle patterns that I’ve published on this blog, quilted with cotton/polyester wadding and then hand bound with a black fabric binding. It’s labelled on the back with my name and the fact it’s my seventh quilt.

As mentioned before – all you have to do to win this giveaway is to be the person closest to the 250,000th view that leaves a meaningful comment somewhere on this blog (spam doesn’t count!). All you have to do then (Sandy F. take note – that’s twice now) is respond to the email from me asking for your postage details!

Just a little thank you from me for supporting me over the months and years 🙂


Design Team Call: Second Round

I managed to get through to the second round of the Creative Expressions Design Team Call 2013-14, and the next challenge was to create a project using their ‘Belle of the Ball’ stamp set. This comes as a rubber sheet which needs cutting up and mounting on the foam backing suitable for use with acrylic blocks – some of the images could have done with a little more space round them, but I managed 🙂

The closing date was yesterday, which allows me to share the projects with you – and yes, I did more than one: one to show I can make a card, another to demonstrate I can think outside the box, and a third to demonstrate altered art and making something out of a cheap pound-shop photo frame. The centre canvas one is quite a size, and even the bow is adapted from the dress stamps. The frame one is a 4×6″ aperture, with the centre coloured dress mounted in front of the glass – printed with Versacraft black ink onto white cotton and coloured with ProMarkers.

I’ll share another tip with you – the label that accompanies the rubber stamp sheet laminates well, and the foam covered stamps stick nicely to it and the whole lot still slides nicely into the original packaging. Perfect storage solution 🙂