Sewing Room Door Plaque (for Creative Expressions)

Sewing Room Door Plaque
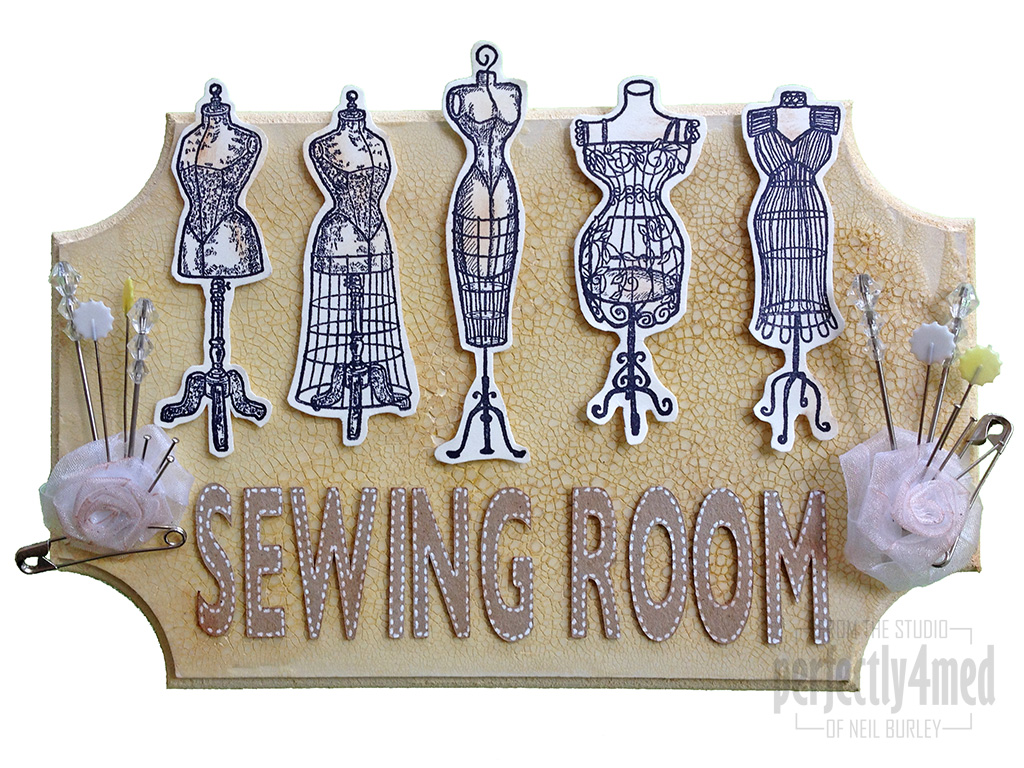
Another of my projects featuring Creative Expressions’ Antique Dressform stamp set. This one is sporting a few embellishments that I wouldn’t consider to be my normal style, but the ribbon roses (also from CE) matched the theme perfectly and made a great pin cushion for the various pins I nicked from my quilting stash. No step-by-step photos this week, but there’s still a kit list and instructions for those that want them:

Continue reading

It only seems fitting… (for Creative Expressions)

It only seems fitting...The other stamp pack I have been sent to work with this month for the Creative Expressions Design Team projects is their unmounted ‘Antique Dressforms’ set. This card features a decoupaged background which I hope is reminiscent of tissue paper dress patterns, and is a relatively quick and easy make.

Continue reading

Mandala Faux Batik (for Creative Expressions)

Faux BatikWhen I saw the contents of the latest DT goodie bag lots of ideas sprang to mind. We’ve been sent the newest set of ‘Henna’ inspired Creative Expressions ‘Singles’ stamps – rubber stamps that are pre-mounted and cut ready for slapping onto your acrylic blocks and printing with straight away. This project uses embossing powder and spray dyes to create a faux batik effect on a handkerchief – although any cotton fabric would work just as well. For more making details, read on šŸ™‚

Continue reading

Dedication Quilt

During my ‘quiet times’ here on the blog, I’m rarely resting! Complete with a conservatory and hall refurbishment over the last couple of months, I’ve been busy on various projects I can’t share at the time. This is one of them – quilting a pre-printed topper (roughly 36×48″) for the dedication (equivalent to christening) of our friends’ newborn son. That happened earlier today, so now I can share without spoiling the surprise!

I used the free motion setting on my sewing machine to quilt round each of the letters and the main lines of each of the illustrations. As normal, I have hand bound the edging and used an 80/20 cotton-polyester wadding. Being able to wash the quilt is a pre-requisite for this age group! At points I wished I had chosen simpler quilting lines, but the finished article was worth the three days worth of man-hours. Now to move onto quilting my very large happy-accident Christmas quilt: more on that in another post šŸ™‚

Christmas stuffing…

It’s no secret that I have become completely bah humbug about Christmas. So it was with a heavy heart I accepted a commission to make a dozen Christmas Tree decorations this weekend. For our tree. So you see why I didn’t turn down the commission! They’re a little rough and ready, but since they’re generally only lit up by fairy lights, who’s going to notice? šŸ˜‰

Stuffed Fabric HeartsI used a heart shaped die to cut the fabric using my Big Shot before putting right sides together, sandwiching 12″ of ribbon in a loop between them and pinning it so the tips of the ribbon peep out of the top. I machine sewed round the edge, leaving an inch gap along one side, and then turned the whole thing inside out before stuffing and sewing the gap closed. I haven’t flame proofed them – might be worth a thought if you have a can of flame retardant spray close by.


Reversible canvas bag

I’ve got the sewing bug sooo bad! But that’s ok as it justifies getting the new sewing machine šŸ˜‰

This afternoon I decided to make myself a stained glass window bag to carry all my quilting paraphernalia to and from future workshops. I didn’t have a pattern to follow, and worked it out as I went – there was only one minor glitch along the way fixing the handles, but got that sorted without too much unpicking. I’ve somehow made it reversible, but who’d want to hide the colour side? After three hours ironing, sewing and cogitating, here’s the results:

And I thought I’d made it big enough – but no, it’s an inch too small (16 inches square) after all the folds and seams were a smidge imprecise. The next one should be quicker šŸ™‚

Another designer handbag

Here’s something else I ran up on my new sewing machine – a designer handbag using the Ā Blossom Shoulder Bag pattern from Amy Butler’s Style Stitches book. The fabric is not one of hers though – I got hold of some mid-weight home decoration cotton prints locally. This one isn’t for sale, but I’m happy to take orders šŸ˜‰

Quilt No. 2

So buoyed up by my first patchwork quilt, I embarked on my second – and bought a new sewing machine (Pfaff Quilt Expression 4.0) as well! This is a quilt-as-you-go jelly roll rail fence pattern, as described in Popular Patchwork magazine (p.31, September 2011). I chose a batik fabric jelly roll from The Fabric Guild. The binding strips are a Hoffmann print, and the backing a dark brown batik double-width cotton, also from The Fabric Guild. Wadding is 80/20 cotton/polyester.

Apologies for the quality of the image – I’m finding photographing large quilts quite tricky! It is 52×61 inches in size, and is for sale – here’s the listing on eBay!

My first quilt – Jelly Roll Sampler

There’s been a bit of a lull in postings – sorry about that! My creativity has had no such lull, so here’s a quick update of my activities…

I finally finished my first quilt – it’s a Jelly Roll Sampler, made with ‘Grace’ by 3 sisters for Moda. Each block took about an hour to make, with the sashing and border taking an afternoon, the basting and quilting another afternoon and the binding another four hours. I’m rather pleased with the outcome, and it’s now gracing our ‘guest’ sofa šŸ™‚

It took me a while to decide on a quilting pattern, helped by the need to wait for an even feed foot for my 12 year old Singer 1012 to arrive in the post! Here’s a close up:

Next for quilting is another Jelly Roll in brown and grey batiks, made to a quilt-as-you-go pattern. It’ll be a while as I’m making another handbag as a Christmas gift…

I’ve got the sewing machine out…

I’m still doing bits ‘n’ bobs for the dining room, including sewing napkins yesterday. Since the table was clear, the sewing machine was out and I was up at silly o’clock this morning, I decided to sew up a Cath Kidston shoulder bag kit from her book ‘sew!’ Two and a half hours later, and a break for sewing machine maintenance, the bag was complete. Not bad for a novice machinist!

20110829-113148.jpg